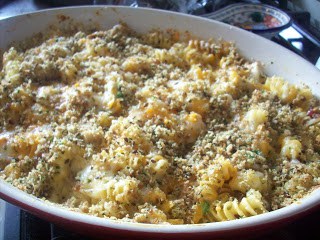
Andrew (my youngest son) came up with the name for this one. I love homemade mac and cheese, or well anything with cheese for that matter! This is a very kid friendly meal. Not figure-friendly, but hey everyone needs a little cheesy goodness sometimes right.
I threw some bacon and chicken in with this, because I had some in the fridge, and because for some reason my boys figure the meal is not complete without meat, and also I am a firm believer that bacon really does make everything taste better! I also threw in a few peas at the end for some color, and to feel like the kids were getting some veggies. You can serve with a tossed salad on the side if you like – and switch up the fillings anyway that you like…or even just go with the basic noodles and cheese without any fillings at all.
Also, I should add that I used half chicken stock and half cream for my cheese sauce. It’s still really creamy and saves you a few extra calories so you can have seconds!
For the meat and veg component
– 1 Cooked Chicken Breast (about 7 minutes per side) with a little Grill Seasoning
– 4 slices thick cut bacon diced and cooked until nicely browned (drain on a paper towel and set aside)
– about 1/4 cup frozen peas (or broccoli, or asparagus…whatever you like or have on hand)
For the Cheese Sauce (don’t usually measure this one so bear with me)
– Approx 1/4 cup (plus a few extra tsps) butter
– Approx 1/4 cup (plus a few extra tsps) flour
– 1 tbsp dijon mustard
– salt and pepper to taste
– 1 1/2 cups chicken stock
– 1 1/2 cups half and half cream
– 2 cups grated cheddar cheese
In a medium saucepan over medium heat cook together the butter and flour (to make a roux). I use a whisk to mix them together well. Let them cook for a few minutes to cook the flour taste out. Add 1 tbsp of dijon mustard (this brings out the flavor of the cheese) and some salt and pepper. Once this is incorporated turn the heat to high and pour in 1 1/2 cups chicken broth and 1 1/2 cups of half and half whisk together well to get out any lumps. Let cook over high…stirring consistently until the mixture thickens (will coat the back of your spoon when its done). Remove from heat and whisk in 2 cups of your cheese until you have a nice sauce…taste and add a bit more salt and pepper to taste if you need to.
For the noodles:
In a large pot bring water to a boil. Salt the water once boiling. Add in 5 cups of short pasta (we used rotini). Cook as per the package directions. I usually undercook mine a bit because they will continue to cook in your cheese sauce in the oven.
To finish you need:
– 2 cups cheddar cheese. grated
– 1/4 cup breadcrumbs (approx.) – you can add more if you like
Place the noodles, cheese sauce, chicken, bacon and peas all together in a large casserole dish. Sprinkle this with a couple more cups of shredded cheese (we used cheddar) and top with some breadcrumbs (coated with a few tsps of melted butter).
You can buy your breadcrumbs if you like (I like the Panko ones) or you can make them. I made them tonight. I use bread that is just about to go stale – or the end crust pieces that the kids don’t like. I put this in my food processor along with a little fresh italian parsley, salt and pepper and a little melted butter to bind (just a tsp or so). Process them until they are the right consistency and…Walla! You have breadcrumbs! Oh – and the butter is just for the mac and cheese topping…if you just want bread crumbs to store in your freezer until you need them, you don’t need the melted butter.
Bake at about 350F until the cheese melts and the breadcrumbs are browned….you can do this under the broiler if you are in a rush. Don’t overcook it.
